Thursday, May 31, 2012

One in a Flash Birthday Party

We recently hosted Griffin's first birthday celebration.  I was so excited to plan his party and went with the theme 'one in a flash.'  I chose this theme because I am a crazy picture taker, my kid is full of smiles, and I wanted to have a fun photo booth for party guests.  Here are the highlights of the party and how I did it on a budget.....


Invitation -- from Photo Affections....got them 50% off with a special they were running.

Our dining room consisted of the food and main decorations.  The color scheme was primary colors.  I made a balloon wreath using coupons for Hobby Lobby (1/2 price ribbon) and Michaels (foam wreath and floral pins).  The balloons I bought from Party City.  I saved the leftovers to be inflated with helium on the party day.  The picture in the middle I printed on my computer and laminated.  The party hat that's on Griffin's head was obtained through a clip art search.


I posted month to month photos on either side of the wreath.  I found two packs of birthday die-cuts at the Dollar Store to use for the pictures (5x7's printed at Walmart 1 hour photo).


We have a great group of friends!  Throughout the year, we've had several gatherings for our kids.  I created a poster with pictures of Griffin and his friends to hang in the dining room.

Everybody loves good food!  Since the party was from 2-4:00, I served finger foods and treats.  Finger foods consisted of two fruit and cheese platters, veggies and hummus tray, veggies and spinach artichoke dip, Tostitos scoops, and pita chips.  The treats were as follows:

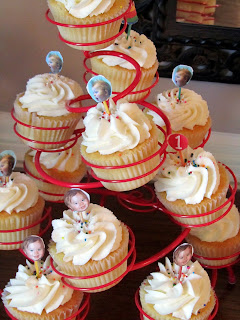
 Cupcakes from The Cupcake People in Lawrenceville, GA.  I bought 3 dozen in Birthday, Oreo, and Turtle Flavors.  I had purchased cupcake holders at Walmart in the clearance section after Valentine's Day for $3 a piece.  I made the cupcake toppers by printing pictures of Griffin, clip art number 1, and clip art party hat from the wreath above.

 Camera cookies were made using sugar cookie dough, cookie icing, and oreo cookies.  I purchased a set of 3 rectangular cookie cutters on Amazon.com for $6.

 My mom made G-shaped cookies using a recipe that my Italian grandmother and her aunt made up years ago.  Typically, the cookies are made into an S-shape.  My grandmother used to make L and P-shaped ones for my brother when we were younger.  These cookies are good to have with coffee...secret ingredient - cognac.


I printed labels for each food item and put them on primary colored cardstock purchased from Target.


To go along with the theme, I had a craft table where the kids and their parents could decorate a foam picture frame to take home with them.  Each child had a ziploc bag with his/her name on it. Inside the bag, I placed the frame and ten birthday themed stickers.


I put the craft table in front of our fireplace to prevent any adventurers from climbing up!  The mantle was simple decorated with streamers from the dollar store and some of Griffin's cards he'd received in the mail.


Next, I had the photo booth set up in our sun room.  I hired Tammy from Lasting Moments by Tammy Photography.  I purchased a backdrop from LemonDrop Stop for $70, and Tammy loved the backdrop so she kept it and subtracted it from her fee.  I purchased funny props from the Dollar Store.  I am really glad that we had the photo booth.  The kids could be silly, and what parent doesn't love having professional photos taken of his/her child?!  I plan to use the photos as enclosure in thank you notes. I haven't posted the individual child photos for privacy reasons, but you can get the idea from our photos below :).


We also had some outdoor activity options....I filled our Munchin inflatable duck tub with bubbles and purchased a variety of bubble blowers. Two of our older guests (ages 2 and 3) had a ball with this activity and were soon soaked in bubble solution! I purchased a bubble machine for Target for about $15 and put it on our deck.  The kids loved watching the magical bubbles and many tried to pop them.  I put several beach balls on our lawn and the kids also enjoyed this activity.


Smash cake time!  Instead of ordering a cake, I made a carrot cake for Griffin from a recipe I adapted in one of his baby food cookbooks.  I bought a Wilton 6-inch pan from Michaels using a 50% coupon (approx. $3) and I also bought a pan from the Williams Sonoma Outlet that had 6 4-inch cake pan slots (approx. $12).  I made a bottom layer with the six inch, a middle layer with the 4-inch, and I used my 'one' cookie cutter to make a number one for the top.  I frosted with homemade cream cheese icing - a recipe I got from allrecipes.com and decorated with the cookie icing I had purchased for the 'one' cookies.  Griffin enjoyed his cake!


This adorable felt birthday hat was a random find at Tuesday Morning for a whopping $4.99!!


I'd say this party was a success!  Our family had a great time, and I think our guests did too!  The best part was seeing this happy birthday boy!


Monday, May 21, 2012

Baby Sign Language

As a speech language pathologist, I am a big proponent of using baby sign language.  Prior to saying real words, a child must master rather complex movements of his facial muscles.  Teaching sign language to your baby enables him/her to communicate wants and needs as his/her language develops.

While using sign language with babies is not a new concept, some are wary of introducing it to a baby who is not deaf or hard of hearing.  Teaching signs to a baby will truly promote and encourage language and speech development.  I recently found a great website on baby sign language  http://www.babies-and-sign-language.com/baby-sign-benefits.html.  The benefits listed on the site were:


  • Promotes the development of language skills
  • Reinforces language skills already developed
  • Reduces frustration at not being able to express needs
  • Increase speed of spatial reasoning development
  • Develops understanding of language for communication of emotions
  • Creates feelings of satisfaction and accomplishment!
  • May increase IQ
  • Increases creative thinking
  • Teaches a 2nd language that is formally and nationally recognized (ASL)
  • Reduces unexplainable emotional outbursts
  • Increases early literacy skills
  • Teaches baby how to start (and participate in) a conversation

  • Teaching sign language to your baby is recommended when the child begins to use his/her hands to signal 'bye bye.'  At this time, s/he is ready to connect a sign to language.  Since I am a crazy speech language pathologist, I've been using some basic signs with Griffin since he was a newborn!  At about 11 months old, he began independently using the sign for 'more' at meal time to request.  Here's a video of Griffin signing for the first time....


    There are some really great baby sign language books that I'll post links to on Griffn's book list.  He really enjoys them, and it's amazing how he pays attention to the signs as his dad and I do them.  If you're interested in learning some basic signs, visit this website for some free printable materials  http://www.babysignlanguage.com/.

    Spaghetti Squash a la Bolognese

    I've been MIA from the blogging world...busy planning Griffin's 1st birthday party.  A blog on that will be coming soon!  In the meantime, here's another recipe for the whole family to enjoy.  Have you ever made or eaten spaghetti squash?  It is delicious!  When cooked and prepared, the squash resembles spaghetti strands.  Spaghetti squash is a great low carb alternative to pasta as well.  It's a favorite dish in our house, and now Griffin loves it too!  Here's the recipe and I'll even share my Italian grandmother's bolognese sauce recipe with you.  Feel free to use any type of sauce you'd like though :).

    Spaghetti Squash a la Bolognese


    1. Use a fork to prick the outside of your spaghetti squash.
    2. Put squash in oven at about 425 degrees and cook until the outside is soft -- about 45 mins to an hour.
    3. Cut the squash in half vertically.
    4. Remove seeds.
    5. Hold one half vertically and using a fork pull down on the squash from top to bottom...hard to explain.  See picture.


    6.  This is what the squash will look like in your serving dish.  Continue to make strands until all squash is used.


    Bolognese Sauce

    It's best to prepare this sauce ahead of time so that you can put it directly on your squash strands.

    Ingredients:

    1 large can crushed tomatoes
    1T olive oil
    1 finely chopped onion
    3/4 lb ground beef (I use the leanest cut)
    1 T chopped fresh basil or you can use dried basil (about 1-2 tsp)
    salt and pepper to taste
    1/2 T flour
    1T bread crumbs
    1T butter
    1/4 cup parmesan cheese (I usually use more than 1/4 cup)

    1. In a large frying pan, saute onion with olive oil until soft and lightly browned.
    2. Break up ground beef and add to onion.  Keep stirring meat until lightly cooked - still a little pink not browned. Add tomatoes, basil, salt, and pepper.  Mix well and saute for about 5 minutes. 
    3. Sprinkle flour over mixture and keep stirring.  
    4. Add bread crumbs, cheese, and butter.  Stir frequently and let simmer until some of the liquid is evaporated - about 15-20 minutes.  Mixture should be thick, but not dry.
    Doesn't this look delicious?


    Thursday, May 3, 2012

    Spanakopadillas

    We are up and running after a week of ear and sinus infections.  Although we're not 100% yet, we all feel much better!

    Here's another family friendly meal for you that will please all palates.  I found this recipe in Family Fun Magazine and decided to give it a whirl.  I added some shredded chicken to the hub's meal for some added protein.  He said it was a nice touch!  The result was 6 thumbs up in our household :).


    • 6 tsp. olive oil
    • 1 9-ounce bag of baby spinach
    • 1/2 cup finely chopped onion
    • 1/2 cup minced scallions
    • 2 tsp. minced garlic
    • 1 large egg
    • 1/2 tsp. salt
    • 1/2 tsp. pepper
    • pinch of nutmeg
    • 2 T minced fresh parsley (I used dried and only used 2 tsp.)
    • 2 T minced fresh dill (I'm not a fan, so I omitted this ingredient)
    • 2/3 cup crumbled feta
    • 4 tortillas
    • 3/4 cup shredded mozzarella
    Heat your oven to 425 degrees.  Warm a large nonstick skillet over medium heat.  Add 2 tsp. of oil swirling it to coat the pan.  Add the spinach (in batches if needed) and saute it until it is just wilted.  Transfer the spinach to a plate to cool.

    Add another 2 tsp. of oil to the skillet and saute onions, scallions, and garlic until they have softened.  Let cool in the pan for about 10 mins.

    Lightly beat an egg in a medium bowl, then whisk in salt, pepper, nutmeg, dill, and parsley.  Stir in the cooled onion mixture.  Gently squeeze handfuls of spinach over the sink to remove the excess moisture.  Add the spinach to the bowl, then add feta, stirring gently.

    Brush a large baking sheet with 1 tsp of oil.  Arrange the tortillas on a work surface. Sprinkle a generous tablespoon of the mozzarella over half of each tortilla - you can eye this!  Top the mozzarella with a quarter of the spinach mixture, distributing it evenly and leaving a thin border at the edge.  Sprinkle another tablespoon of mozzarella over the spinach.  Fold each tortilla in half and place on baking sheet.  Brush the tops and edges with a little olive oil.

    Bake on the top rack for 10 minutes. Make sure they cool a little before serving.


    Wednesday, April 25, 2012

    The First Ear Infection

    So, we've done pretty well...the first ear infection at 11 1/2 months old.  Not too bad. Aside from the common cold, ear infections are the second highest diagnosis in children in the United States.  Research states that 3 out of 4 kids will have had at least one ear infection by the time they are 3 years old.

    As a speech language pathologist, I had to take a course in Anatomy where we studies the brain, ear, mouth, and throat.  Yes, I had to memorize and draw all of these babies.  If you ask me today, can I draw them?  Heck no!  I refer to my trusty diagrams all of the time and use them as handouts for parents.  Here is a diagram of your ear in case you are interested.


    This is what the ear normally looks like.  Here is an comparison of a normal middle ear and one that has an infection.


    Kids develop ear infections more frequently in the first 2 to 4 years of life for many reasons:
    • Their eustachian tubes are shorter and more horizontal than those of adults, which allows bacteria and viruses to find their way into the middle ear more easily. Their tubes are also narrower and less stiff, which makes them more prone to blockage.
    • The adenoids, which are gland-like structures located in the back of the upper throat near the eustachian tubes, are large in children and can interfere with the opening of the eustachian tubes.
    A number of other factors can contribute to kids getting ear infections, such as exposure to cigarette smoke, bottle-feeding, and day-care attendance.  Ear infections also occur more commonly in boys than girls, in kids whose families have a history of ear infections, and during the winter season when upper respiratory tract infections or colds are frequent.

    How do you know if your child has an ear infection?  Here are some things to look for:

    • The fluid in the middle ear may push on the eardrum, causing ear pain. An older child may complain of an earache, but a younger child may tug at the ear or simply act irritable and cry more than usual.
    • Lying down, chewing, and sucking can also cause painful pressure changes in the middle ear, so a child may eat less than normal or have trouble sleeping.
    • If the pressure from the fluid buildup is high enough, it can cause the eardrum to rupture, resulting in drainage of fluid from the ear. This releases the pressure behind the eardrum, usually bringing relief from the pain.
    In Griffin's case, we really had no idea.  We thought he had the common cold because he was not exhibiting any of these symptoms.  This was his disposition the night before we took him to the doctor.


    Yeah - this kid had an ear infection?!?  


    Many people think that ear infections are contagious.  However, they are not contagious, though a cold that may lead to one can be contagious.

    Middle ear infections often go away on their own within 2 or 3 days, even without any specific treatment. If your doctor decides to prescribe antibiotics, a 10-day course is usually recommended.  When we visited our pediatrician, Griffin was diagnosed with an ear infection in his right ear and fluid was present in his left ear.  He also presented with a very runny nose and thick congestion.  Griffin was prescribed a 10-day course of antibiotics and ear drops for any ear pain or discomfort.  He was also given a nasal spray for the congestion to be used after being on the antibiotic for a couple of days if nasal congestion was still present.  Our pediatrician does not prescribe decongestants for babies because he says that research supports that they are not effective in babies. He also recommended Baby Vicks Rub, the humidifier, and ibuprofin because Griffin has many teeth coming in which could add to his discomfort.  The antibiotics took effect very quickly.  We've only been using the ear drops at night.  He continues to exhibit congestion, so we will use the nasal spray this evening.

    As my husband and I were getting Griffin ready for bed last night, I thought about all of the effort that goes into his normal bedroom routine even when he's not sick -- bath, special lotions for body and face, saline nose drops, combing hair, diaper change, story time....it can be exhausting!  It made me think about how some children don't get this kind of care due to poor home situations or uneducated parents.  Give all of your sweet kiddos extra hugs tonight!  They are lucky to have such great parents!

    Friday, April 20, 2012

    Bye Bye Breakfast

    Today, I hosted a farewell breakfast for Griffin's friend, Mary Alice and her mom Heather.  They have become great friends of ours and wonderful additions to our 'Mommy-Baby Group.'   They are relocating to the Pittsburgh area, and our group wanted to give them a proper send off.

    Mary Alice and Heather - the guests of honor


    The breakfast menu featured the following: blueberry muffins (my grandmother's recipe); zucchini quiche; mushroom, bacon, and shallot quiche; mollete (courtesy of Liliana); chocolate covered strawberries (thanks to Michelle & Dale); homemade biscuits (my husband Michael's specialty); and mini quiches (thanks to Adrienne). The recipes were all baby friendly except for the chocolate - an wonderful indulgence for the adults!  Beverages were coffee, juice, and mimosas.  Recipes and pictures are below.


    The M A biscuits were made especially for Mary Alice!

    Blueberry Muffins


    • 2 cups Bisquick
    • 1 cup flour + 1/4 cup flour
    • 1 t. baking powder
    • 3/4 cup sugar
    • 1 1/4 cup milk or buttermilk (I use and prefer buttermilk)
    • 1 egg, well beaten
    • 4 T. butter
    • 1 1/2 cup blueberries


    1. Mix 1/4 cup flour with blueberries. Set aside.
    2. In a large bowl, put Bisquick, flour, baking powder, sugar, egg, butter, and milk.
    3. Beat with mixer until well blended. Dough should be thick. Add blueberries. Fill 2/3 way in muffin cups in pan. Sprinkle the tops of the muffins with sugar.
    4. Bake at 400 degrees about 20 min or until golden brown.

    Mushroom, Bacon, and Shallot Quiche

    • 8 thin slices bacon, about 6 ounces
    • 4 tablespoons unsalted butter
    • 1 pound mushrooms 
    • 1/2 teaspoon kosher salt, plus more for seasoning
    • 6 medium shallots, finely chopped, about 1/2 cup
    • 1 clove garlic, chopped
    • 2 tablespoons minced flat-leaf parsley
    • 2 tablespoons freshly grated Parmesan cheese
    • 2 cups half-and-half ( I used fat free half and half)
    • 2 large eggs
    • 2 large egg yolks
    • Freshly ground black pepper
    • Generous pinch freshly grated nutmeg
    • 4 ounces grated Gruyere or Swiss cheese, about 1 cup (I used Swiss cheese)
    • 2 tablespoons snipped fresh chives
    Preheat oven to 350 degrees F. Cook the bacon in a medium skillet, over medium-high heat until just crisp. Transfer to paper towels to drain. Discard all but 2 tablespoons of the fat in the pan. Add 2 tablespoons butter, the mushrooms and 1/2 teaspoon salt. Cook, stirring over medium heat, until the mushroom juices evaporate, about 7 to 10 minutes. Add the shallots and cook until tender and mushrooms are golden, about 3 minutes more. Add the garlic and parsley. Remove from heat, cool slightly.  

    Brush a 9-inch glass or ceramic pie pan with the remaining butter and sprinkle evenly with the grated Parmesan. Place pan on a baking sheet. Scatter half the Gruyere into the pan and crumble the bacon on top. Add 3/4 of the mushrooms, then the remaining cheese.


    Whisk the half-and-half, eggs and yolks in large glass measuring cup. Season with salt, pepper, and nutmeg to taste. Pour the custard over the fillings. Top with remaining mushroom mixture and sprinkle with chives.
    Bake until the quiche is just set in the center, about 40 to 50 minutes. Cool completely on a rack before serving.

    Zucchini Quiche

    • 3 cups grated and skinned zucchini
    • 1 medium onion - chopped
    • 4 eggs
    • 1/4 cup vegetable oil
    • 1/2 cup grated Parmesan cheese
    • 1 tsp. oregano
    • 1 cup Bisquick 
    • Salt and pepper to taste
    Preheat oven to 350 degrees.  Saute onion in a saucepan over medium heat.  In a large bowl, beat eggs well.  Add oil, Parmesan cheese, onions, oregano, salt, pepper, zucchini, and Bisquick.  Combine all ingredients well.  Coat a 10-inch pie pan or an 8X8 glass pan with cooking spray.  Add mixture.  Bake for 45 minutes or until golden brown.  This can be served with apple sauce or sour cream if desired.
    Note:  The quiche can also be made with 1/4 cup shredded Gouda cheese and 1/4 cup grated Parmesan cheese.

    The kids all played together nicely and had fun!


     Griffin knows where the good stuff is!


    Since Mary Alice won't be here to celebrate her 1st birthday, the kids got her a Go & Grow Giraffe by Little Tikes.


    All of the kids had a blast playing with Mary Alice's tissue paper!


    Griffin wanted to help his best friend out by pushing her around on the giraffe.


    After the party, I cleaned up quickly because we had a house showing at 3:00.  Whew...I was exhausted.  Perhaps the best part of the day was during Griffin's afternoon nap....


    I got to enjoy another piece of Liliana's delicious mollete!!


    Thursday, April 19, 2012

    Aunts are Special

    The first few days of your child's life are so precious and unforgettable.  It's the time when you realize you didn't know you could love someone as much as you love this new life.  One of my favorite photos of Griffin from the hospital is this one.


    This is his Aunt Martha, and she is one special lady!  Look at what a snuggle bug my little guy was :).  You can tell how excited she was to meet her new nephew.  Martha knows a lot about raising boys.  She has two sons of her own - ages 18 and 24.

    Tonight Martha joined us for dinner.  It's been a couple of months since she's seen Griffin.  It was so great to see her, and Griffin had a wonderful time playing with his aunt.

    Here's this duo almost one year later....


    Thanks for visiting, Aunt Martha!!  We love you!!